Pages

Sunday, July 28, 2013

How to control Flying Radio Control I.C. Powered Model Aircraft ? Introduction Part 1

Part 1 Introduction 

 Welcome to the world of Radio Control Model Flight.  So what got you interested in this fascinating but almost masochistic hobby!?  A hobby where, if you take the wrong approach, you will almost certainly enter and leave (in fairly rapid succession) a disillusioned and much poorer individual.

You’ve probably encountered some model fliers enjoying themselves at the club field wringing all sorts of manoeuvers out of their models.  You’ve watched in awe as these miniature flying machines defy all the rules of gravity and appear to be capable of doing things even full size aircraft can’t do.  You’re thinking to yourself “Oh to be able to do what these guys can do”.  Well strange as it may seem, YOU CAN!

Saturday, July 27, 2013

Revell's 1/32 scale Messerschmitt Bf 109 G-6 Part 2

Construction Impressions


This build was straight from the box, so I kept the moulded-on harness straps even though I was not keen on them. In the end though, I was really pleased with the way they looked after careful painting. Oddly, the shoulder straps appear to disappear behind the seat pan but it will be a simple matter to add hardware and maybe a short extension to the straps.

Revell's 1/32 scale Messerschmitt Bf 109 G-6 Part 1

This model was built straight from the box for a forthcoming book to be released by ADH Publishing.
Revell's initial release will include parts for an early and a late Bf 109 G-6, including:
  • alternative cockpit parts (different cannon breech covers, alternative footrests, and battery box option behind the pilot's head)
  • both early framed and clear-vision Erla canopies; and two windscreen versions
  • standard and tall tails
  • long and short tail wheel strut and alternate tail wheel well fairings
  • treaded and smooth main wheels
  • Morane mast with clear insulator base and DF loop for late version
  • early and late shell ejector panels under the fuselage
  • alternate starboard side engine cowls (with and without the G-5-style compressor bulge).

Human Posture Analysis - Adapting Range of Motion to Keep Best Posture

Adapting Range of Motion to Keep Best Posture

The purpose of this task is to set the angular limitations of the selected segments so that these limitations correspond to the best range of motion, that is, the range of motion where the postural score is the highest.
Please refer to Editing Preferred Angles for information on how to create preferred angles and assign scores to individual ranges of motion.
1. To optimize the range of motion of any particular set of segments, first select the desired segment(s) and then click on the Optimize Posture icon.  
For each selected segment and for the current active degree of freedom, the command looks for all preferred angles created that have been assigned scores. The command then sets the angular limitations to the range containing the highest score.
When this command is run, the posture of the segment(s) may change in order to reflect the new angular limitations.
It is possible to use this command to optimize the posture of the manikin as a whole. To do this, select the Body node in the specification tree before activation the Optimize Posture command.  
This is particularly useful if the manikin's movements must be restricted to the "comfort zone". The postural score of such a manikin will stay at its highest, no matter how the manikin is moved. For more details, please refer to Using the Postural Score.
It is possible that some or all of the selected segments may contain no preferred angle information or some of the angles may be locked. In these cases, and these cases only, the Optimize Posture command might fail. If the command fails for a subset of the selected segments, a message window will appear displaying the list of segments for which the optimization failed. 
2. To reset the angular limitations of a manikin, select the segments that must be reset and click on the Reset to Default Angular Limitations icon. 

Human Posture Analysis - Segment Coloring

Segment Coloring
Access to segment coloring is through the Properties dialog box. 
1. Right-click the manikin in the specification tree and select Properties from the contextual menu. The  Properties dialog box appears. 
2. In the Manikin tab, select the Coloring sub-tab. 
●     Show Colors: These radio buttons are used to enable and disable the coloring. 
❍     None deactivates the coloring.
❍     All activates the coloring.
❍     All but Maximum Scores activates the coloring on all segments except those with scores at their maximum. This feature can be used, for instance, to display colors only if the manikin goes out of its comfort zone.
●     Degree of Freedom This combo is used to choose the degree of freedom to activate. This combo is enabled only if the coloring feature is active.

Human Posture Analysis - Mirror Copy


Mirror Copy
The mirror copy function will copy the preferred angles of the selected segment (in all degrees of freedom) onto the opposite side of the manikin.
Mirror copy functionality can only be applied to segments that have an equivalent segment on the other side. If there is no equivalent segment, Mirror Copy will be disabled in the contextual menu. It is also disabled in the contextual menu when you select the entire manikin or the "Body" node.
Swap
The preferred angles of each selected segment will be copied to the opposite side of the manikin and vice versa. If a segment does not have an equivalent on the opposite side, Swap will be disabled in the contextual menu.
Using and Optimizing the Postural Score
This procedure describes how to use the List and Chart displays in the Postural Score Analysis dialog box and optimize the postural score. It also describes how to set segment coloring and how to customize the list and chart display in the Postural Score Analysis dialog box.

Human Posture Analysis - Editing Preferred Angles

Editing Preferred Angles
This procedure describes how to use the Edit Preferred Angles command. By dividing the total range of motion of the manikin into a certain number of ranges, it is possible to compute a global and a local score that quantifies the current posture. The Edit Pref
erred Angles command enables the user to define these ranges on individual DOFs. Selecting another segment while the command is running opens the Preferred angles dialog box for the new segment and closes it for the previous one.
1. Select the Edit Preferred Angles icon  and then select a  segment. The preferred angles for that segment are displayed.


2. With the right mouse button, click anywhere in the white range of motion region to display the contextual data.
Click on an option to activate it.

Human Posture Analysis - Locking DOFs

Locking DOFs
1. To lock a degree of freedom, select the lock icon  and then select the segment(s) to be locked. Multiple segments can be locked at the same time
if they are pre-selected before the activation of the command.
If the operation is successful, a message window will appear displaying the segments that have been locked.
2. Follow these steps to discover the existing locked segments on a specific manikin: 
a. Access the manikin Properties panel. To do this, right-click on the manikin from the product tree and select Properties. 
OR select Edit -> Properties from the main menu.
The Properties panel appears.
b. Select the Manikin tab which is the last tab of the panel. c. Select the Lock sub-tab which is dedicated to lock/unlock 

Human Posture Analysis - Selecting Manikin Display Attributes

Selecting Manikin Display Attributes
This procedure describes how to set and edit manikin display attributes.
In the Utilities toolbar, select the Display Attributes command icon . The Display Attributes dialog box appears with the following 
choices:
Rendering


●     Segments
●     Ellipses
●     Surfaces
●     Resolution
Vision
●     Line of sight
●     Peripheral cone
●     Central cone
●     Cone type
Others

Human Posture Analysis - Angular Limitations Undo/Redo

Angular Limitations Undo/Redo
This procedure describes how to use the Undo/Redo feature with angular limitations. Undo/Redo allows you to reverse (cancel) the last angular limitation parameters applied to the manikin.

Undo
Click the Undo icon  in the Standard toolbar to execute the Undo command.
The images below show the state of a manikin after applying the Undo command to a particular set of angular parameters.

Redo
This command repeats the last cancelled action. Click the Redo icon  in the main menu toolbar to execute the Redo command.
A Redo operation can also be undone. For example, you can restore the last angular limitation parameters by invoking the Undo  command.

Human Posture Analysis - Displaying and Editing Angular Limitations

Displaying and Editing Angular Limitations
This procedure describes how to display the values of the angular limitations for the DOF (degrees of freedom) that is currently active. It also describes how to set angular limitations as a percentage.
1. Select the Edit Angular Limitations icon   and then select a segment. 
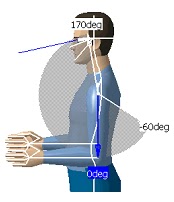
The limits arrows are displayed. These arrows are set by default at the mean values of movement limits. The colored region represents the total range of motion for that DOF. 

●     The green arrow shows the upper limit.
●     The yellow arrow shows the lower limit.
●     The blue arrow is used to change the position of the active segment.
Selecting another segment while the command is running opens the angular limitations for the new segment and closes them for the previous one.

Human Posture Analysis - Animate Viewpoint

Animate Viewpoint
This option zooms on the selected segment and changes the viewpoint in order to provide the best possible view for that degree of freedom. This improves the range of motion chart display and as well as the capability to better manipulate the blue arrow. 
Predefined Postures
Use the Predefined Postures functionality to assign a predefined posture to the worker. From the Predefined Postures list, choose from the six available postures.

Human Posture Analysis - Lumbar

Lumbar

Hand filter:
●     When the Hand Only option is selected, only the hand is available in the Segments multi-list.
●     When the Hand and Fingers option is selected, all of the fingers are also available in the Segments multi-list.
Side:
When you edit certain segments such as the arm, you can choose which side you want to work with: Left or Right.
Left is the default option when the dialog box opens. 
Degree of Freedom
From the Degree of Freedom list, you can choose from three types of DOFs: 
●     flexion/extension
●     abduction/adduction
●     medial rotation/lateral rotation
The default when the dialog box opens is flexion/extension.

Human Posture Analysis - Getting Started

Getting Started
This tutorial provides an overview of Human Posture Analysis functionalities. It provides a step-by-step scenario showing you how to use key functions.  
The task described in this section is:
Creating a Manikin

Creating a Manikin

User Tasks

Saturday, July 13, 2013

Human Posture Analysis - Accessing Sample Documents

Accessing Sample Documents
To perform the scenarios, sample documents are provided. For more information about this, refer to "Accessing Sample Documents" in the Infrastructure User's Guide.

Conventions
Certain conventions are used in CATIA, ENOVIA & DELMIA documentation to help you recognize and understand important concepts and specifications.
Graphic Conventions
The three categories of graphic conventions used are as follows:
●     Graphic conventions structuring the tasks
●     Graphic conventions indicating the configuration required
●     Graphic conventions used in the table of contents
Graphic Conventions Structuring the Tasks

Graphic conventions structuring the tasks are denoted as follows: This icon... Identifies...

Human Posture Analysis - User Tasks

User Tasks
Using the Posture Editor
Selecting or Editing the DOF (Degree of Freedom)
Displaying and Editing Angular Limitations
Angular Limitations Undo/Redo
Direct Kinematics
Selecting Manikin Display Attributes
Locking and Unlocking DOFs
Editing Preferred Angles
Preferred Angles: Reset, Mirror Copy, and Swap Functionality
Using the Postural Score
Adapting Range of Motion to Keep Best Posture

Workbench Description
Human Posture Analysis Menu Bar
Current Workbench
Return to Previous Workbench
Utilities Toolbar
Angular Limitations Toolbar
Preferred Angle Toolbar

Overview
Welcome to the Human Posture Analysis User's Guide! This guide is intended for users who need to become quickly familiar with the product.
This overview provides the following information:
     Human Posture Analysis in a Nutshell
     Before Reading this Guide
     Getting the Most Out of this Guide

Monday, July 8, 2013

India’s First Navigation Satellite Successfully Launched Images 2013

  • ISRO’s Polar Satellite Launch Vehicle c22


    Launch Vehicle, PSLV-C22, has successfully launchedIRNSS-1A, the first satellite in the Indian Regional Navigation Satellite System (IRNSS) from Satish Dhawan Space Centre, Sriharikota.